
All of Undercover Job’s missions have been solved, and that means that Depot 2BSTX is not up for grabs anymore. But if you choose to give it a shot and solve them anyway, these walkthroughs will hopefully prove helpful if you get stuck. Spoilers are covered by grey rectangles - move your mouse over them, and you will see a bit of text that will get you a good step further. But maybe you don’t even need that?
Paragraphs that are typeset in red italics contain information that is not essential for solving the missions. But nevertheless - there is something that wants to be discovered here!
And if you still get stuck with a mission, or if you have any questions or comments, Agent 002 1/2 will be glad to hear from you under info@undercover-job.com.
MISSION 1: HEAR THE SIGNS
Mission 1 - Hear The Signs
Method of encryption: Morse code
Important clues: Morse key, Morse alphabet, Note in Alan Turings chest pocket
Hidden active and clickable areas: Sheet of paper with Morse alphabet, sheet of paper with blue scribbling N/A, sheet of paper "...AR THE SIGNS“, Morse key, head of the sitting man, slip of paper in the sitting man's chest pocket, house, radio in window
Solution method:
1. Print out the Morse code alphabet.
----------------------------------------------------------------------------------------------------------------------------------------------------------
2. By using an example, the slip of paper in Alan Turing’s chest pocket holds an important clue on how to apply the Morse code to the sheet music.
The word BASS is transcribed to the Morse code by using the Morse alphabet: 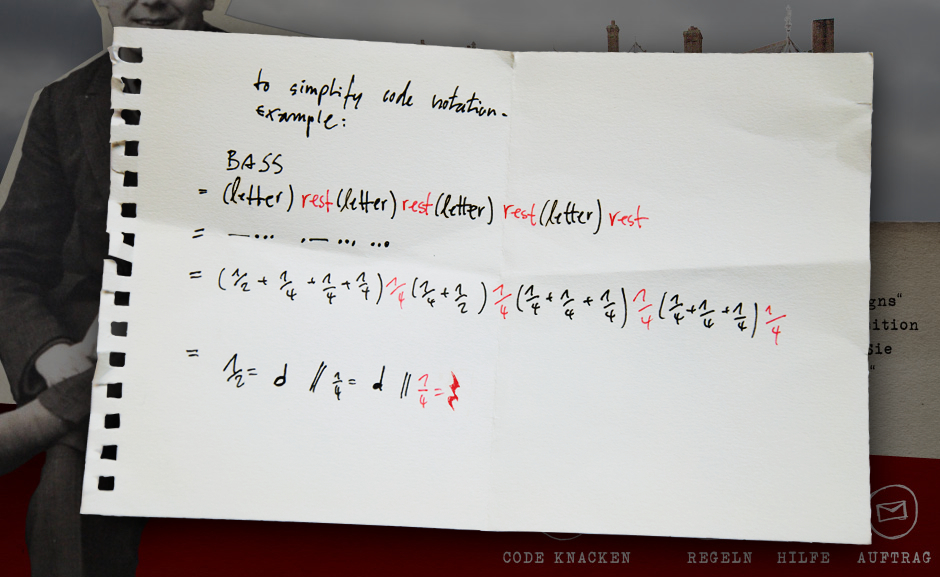
B A S S
(Letter) rest (Letter) rest (Letter) rest (Letter) r est
This is converted into the following Morse code:
_... ._ ... ...
We define the value ½ for the Morse character "_“ (Dash),
the value ¼ for the Morse character ".“ (Dot),
and the value ¼ (in red) for spacing in between letters.
Value ½ (=Dash) corresponds to a half note.
Value ¼ (=Dot) corresponds to a quarter note.
Value ¼ in red (=letter spacing) corresponds to a quarter rest.
------------------------------------------------------------------------------------------------------------------------------------------------------
3. The bass is mentioned on the slip of paper in the chest pocket. The bass notes in the piece HEAR THE SIGNS are as follows:

By using what we learned from the slip in the chest pocket, these notes can be translated into Morse characters. Three quarter notes translate into three dots, the quarter rest represents a letter spacing, a quarter note becomes a dot, etc.
The entire bass line translates into the following Morse code:
... . ..._ . _.
Translated into letters: SEVEN
Solution code: SEVEN
Did you notice the following?
1.) HEAR THE SIGNS is the seventh track on the CD album and has a duration of 7:07 min - that's 427 seconds. 427:7=61. The cross total of 61 is 7.
2.) Alan Turing’s radio transmits two Morse codes. The first line of code means YYZYYZYYZYYZ etc. With reference to that, check out this wikipedia entry: http://en.wikipedia.org/wiki/YYZ_%28instrumental%29The second line or Morse code translates to EEVEEVEEVEEV etc. Beneath this Morse code, you can read „ADAM AND“ Together, that gives you ADAM AND EVE. The word EVE has been hidden with a Morse code in the song LUCIFER by „The Alan Parsons Project“. You can listen to it here: http://youtu.be/EAGUUrgmBkQ
MISSION 2: NEW HERO, NOWHERE
Mission 2 - New Hero, Nowhere, New Hero, Nowhere (Reprise)
Method of encryption: Solmisation, Anagram
Important clues: Fiosa-Sofia, Pebustad-Budapest, the colours of the countries’ flags, Sarah Glover, Zoltan Kodaly
Hidden active and clickable areas: Sheet of paper in envelope, cassette tape, right and lefthand corner of the image, stamp
Solution method:
1. Research about Sarah Glover und Zoltan Kodaly shows that both have interest in solmisation, in which the notes C, D, E, F, G, A and B are named by the syllables do, re, mi, fa, so, la and si.
---------------------------------------------------------------------------------------------------------------------------------------------------------------------------
2. Fiosa-Sofia, Pebustad-Budapest and the different order of the colours in the countries’ flags point to an anagram.
---------------------------------------------------------------------------------------------------------------------------------------------------------------------------
3. It is mentioned in the mission’s task that the same message is hidden in two different pieces of music, New hero, nowhere and New hero, nowhere (Reprise). Closer inspection of the two pieces shows that they have a common bassline: C, D, A, C
----------------------------------------------------------------------------------------------------------------------------------------------------------------------------
4. When the rules of solmisation are applied to these notes it leads to the syllables do, re, la, do.
----------------------------------------------------------------------------------------------------------------------------------------------------------------------------
5. The secret message names the place where agent 002 ½ is currently located. Thus is what we are looking for is a name of a location that can be formed by rearranging the letters do, re, la, do.
Solution: ELDORADO
Did you notice the following?
1.) The original theme song from MISSION IMPOSSIBLE by Lalo Shifrin is composed in a 5/4 measure – just like NEW HERO, NOWHERE.
2.) In NEW HERO, NOWHERE you will find a musical quote of MISSION IMPOSSIBLE’s medody at (4:12 – 4:26).
3.) NEW HERO is an anagram of NOWHERE.
MISSION 3: SENSITIVE
Mission 3 - Sensitive
Method of encryption: Braille-alphabet, Anagram, extended Caesar cipher
Important clues: The word „SENSITIVE“ in the startscreen, blind camel Ana, strip of paper with 26 letters, telegram, dots
Hidden active and clickable areas: Red dots
Solution method:
1. The dots, the blind camel named Ana and the rubbed-through word “ SENSITIVE” refer to the braille-alphabet.
--------------------------------------------------------------------------------------------------------------------------------
2. In the mission screen, the little paper dots left of the palm trees spell the word ANAGRAM in braille-alphabet.
Ana, who weighs 650.000 grams, is also an clue towards Anagram.
--------------------------------------------------------------------------------------------------------------------------------
3. The message in the telegram reads ORINT-SABS. That is an anagram for BASS-INTRO.
--------------------------------------------------------------------------------------------------------------------------------
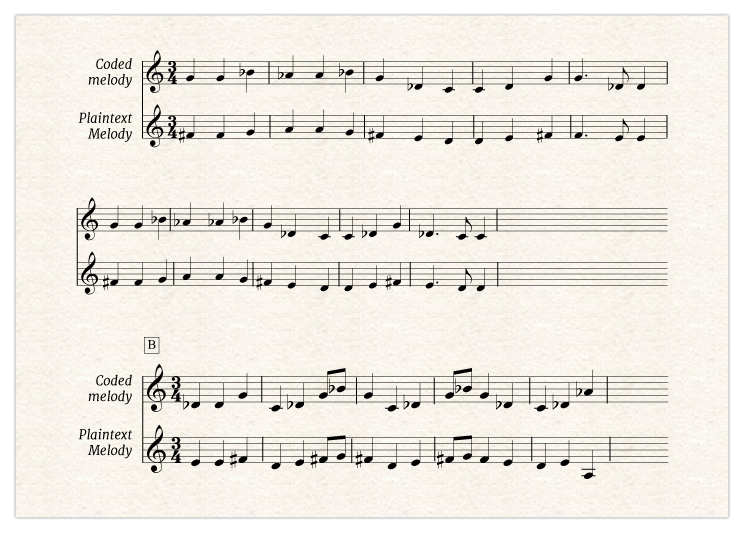
4. In the intro of the bass part, the heads of the notes can be interpreted as dots used in braille-alpabet.

This translates into the letter string NENI.
---------------------------------------------------------------------------------------------------------------------------
5. Above the letter string on the paper strip with 26 letters, one writes down the alphabet:

The letters N-E-N-I from the bottom line are changed to their counterparts from the top line. This gives us the letters Z-I-Z-A.
-----------------------------------------------------------------------------------------------------------------------------
6. The track’s subtitle is „Lawrence takes 4-3-2-1”. Camel Ana, split into 4 pieces in the middle row of mission-screen, follows the same idea. Ana’s butt is in the first dot, her head in the last. This is a clue towards backwards.
-----------------------------------------------------------------------------------------------------------------------------
7. ZIZA read backwards becomes the anagram AZIZ.
Solution Code: AZIZ
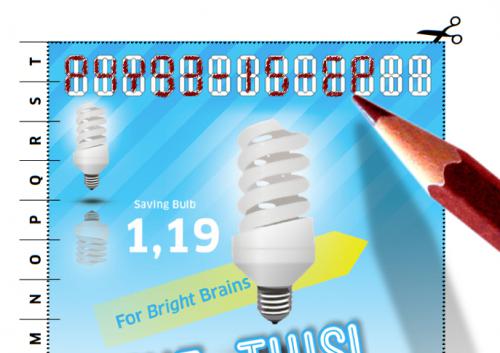
MISSION 4: TELL ME YOUR NUMBER
Mission 4 – Tell Me Your Number
Method of encryption: Substitution, based on the number phi and the Fibonacci sequence
Important Clues: Piece of paper in Flatbroke's hand; Paper with the number of letters noted; Math problem; rulers; Nuts (Nüsse – German version only); „list of things“ (English version only)
Hidden active and clickable areas: Piece of paper in Flatbroke's hand; Binders „P“, „F“, „?“ and „Note“; Cassetteplayer; Sheet in typewriter; Postcards; Glasses; Ruler segments; Attachment „S“; elements from the „List of things“ (English version only); Bags of nuts (German version only)
Solution method:
1. Binder „P“:
The Postcards tell us that only the treble notes are relevant and the bass notes can be ignored.
English version:
There is a numbered list of things on the right side of the open binder “P”, all of which are marked with the annotation “not”, and all of which can be abbreviated by “ES”. Combined, that spells out “not-es”, or the word “notes”.
German version:
Somebody counted nuts on the right side of the opened binder “P”. The wrapper gives away their Dutch origin. The Dutch word for nuts is “noten” – german for “notes”.
On a separate slip of paper, Flatbroke typed a message asking 002 ½ for help. 002 ½ has responded on the same piece of paper and, as a hint, has counted the number of letters in every word of Flatbroke's text.
If you combine the clues on the right and left hand side of binder “P”, you will learn that you have to count the treble notes per bar – just as 002 ½ did with the letters in Flatbroke's message. That gives us the following result:
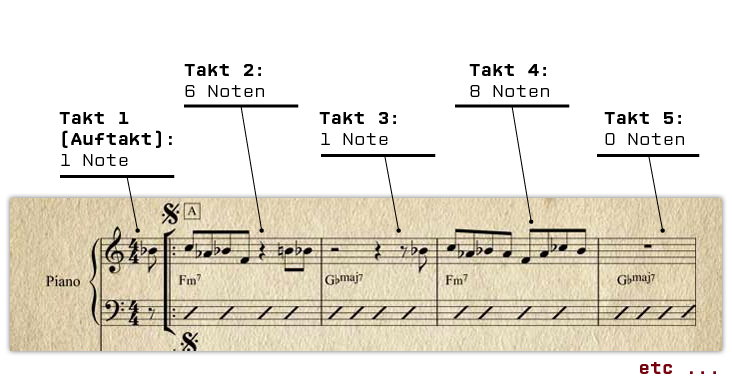
Written down consecutively as digits, one gets the following number:
1 (pickup), 6180339887498
1, 6180339887498 is the number phi. This irrational number represents the proportion of the golden ratio (see also http://en.wikipedia.org/wiki/Golden_ratio)
On closer inspection of the piece of paper in Flatbroke's hand you will find the term “proportion”. This is another clue towards the golden ratio and confirms that the letter “P” on the label on the binder refers to phi.
----------------------------------------------------------------------------------------------------------------------------------------------------
2. Binder “F”
Right side, math problem – the fence in the image looks likes like staves divided into single bars.
Left Side:
The segments of rulers represent the parts A, B, C, D and E of the composition “Tell Me Your Number”.
A click on the individual segments reveals further clues:
Yellow segment – melody (part A)
Brown segment – bass-solo – (part B)
Pink segment: a lone zebra points to piano-solo – (parts C and D)
Black segment: drum-solo – (part E)
In the sheet music, the beginnings of those parts are marked by the respective letter in a square – just as it is done with the letter “A” at the math problem on the right side.
If you count the bars of single and combined parts of “Tell Me Your Number” you will find several numbers from the Fibonacci sequence:
Part B: 8 bars
Part A: 13 bars
Part A und B: 21 bars
Part C und D (Piano-Solo-Form): 21 bars
Part A,B und A (Beginn des Piano-Solos): 34 bars
Part C und D (ein Durchgang des Pianosolos): 34 bars
Part A, B, A, C und D: 55 bars
Number of bars from the beginning of the composition to the end of the drum solo: 144 bars
Thus, the label of binder “F” refers the Fibonacci-sequence.
-------------------------------------------------------------------------------------------------------------------------------------------
3. Binder „?“
Application and Compensation for Reimbursement of Travel Expenses
In line “P” of the form, enter the numbers that have been identified in binder “P” – the digits of Pi (π): 1, 6, 1, 8, 0 , 3, 3, 9, 8, 8, 7 ,4, 9, 8. Digits for the last five cells are missing. They can be filled in by continuing die digits of phi that can easily be researched. They are the digits 9, 4, 8, 4, 8.
Line “F” of the form is completed with the number that has been identified in binder “F”. It is the Fibonacci-sequence: 1, 1, 2, 3, 5, 8, 13, 21, 34, 55, 89, 144, 233, 377, 610, 987, 1597, 2584, 4181 (“0” has already been entered in the first cell).
The numbers in rows “P” and “F” that align vertically are multiplied as described in the first column, the result is entered in row “S”: 1, 6, 2, 24, 0, 24, 39, 189, 272, 440, 623, 567, 2097, 3016, 5490, 3948, 12776, 10336, 33448
Every number in row “S” of the Application form can be assigned to a letter in the compensation form. I.e., the number 1 is assigned to the letter N.
With this method, the numbers in row “S” translate into following sequence of letters:
NEVERENDINGLOVEKISS
Solution Code: NEVERENDINGLOVEKISS
Did you notice the following??
1.) Leo – mentioned in the math problem – is a reference to Leonardo da Pisa, better known as Fibonacci.
2.) The solution for the math problem is 144, the 12th or 13th number in the Fibonacci sequence (depending on if you include 0 or not).
Further details about this mission can be found in the CD-booklet. (More about that in the toogle box “CD”)
MISSION 5: KRYPTO
Mission 5 - Krypto
Method of encryption: ADFGVX, grille cipher
Important Clues: Text on record sleeve and label, french wine and bread, floppy disc labelled battleships, stopwatch, views on computer screen, tea kettle, print-out with letter matrix
Hidden active and clickable areas: Turntable, computer screen, Folder „innen“ (German for „inside“), upper right corner of window „innen“ (to close it)
Solution method:
1. Record
On the record sleeve and label, the following letters are typeset in uppercase: ADFGVX
ADFGVX is a method of encryption – see http://en.wikipedia.org/wiki/ADFGVX_cipher
---------------------------------------------------------------------------------------------------------------------------------------------------------------------------------
2. Wine and Bread
The bottle of french wine and the bread are a picture puzzle:
Bread: pain (french)
Wine: vin (french)
Georges Painvin is a french cryptanalyst who broke the ADFGVX code in 1918. This picture puzzle confirms the ADFGVX method.
------------------------------------------------------------------------------------------------------------------------------------------------------------------------------------
3. Battleships
Battleships, as written on the label on the floppy disc, is the name of a game that is based on locating coordinates in a matrix – it also refers to the ADFGVX encryption method.
-----------------------------------------------------------------------------------------------------------------------------------------------------------------------------------
4. Stopwatch
The intervals that can be found on the stopwatch indicate the intervals in the composition Krypto that are relevant for the mission. The sequence of musical notes in these intervals are as follows:
Intro (in time) upper voice

Interlude:
 --------------------------------------------------------------------------------------------------------------------------------------------------------------
5a. Computer screen, 1st window:
The names of the horizontally aligned (1,5.txt, 2,5.txt, etc) and the vertically aligned (1.txt, 2.txt, etc) files resemble a ADFGVX-matrix. The sequence of file names indicates that the 12 possible notes C, C#, D, D#, E, F, F#, G, G#, A, A# and B have to be arranged alternately in the first column and the first row of the matrix. This has to be done in whole steps, thus splitting the 12 notes into two groups (C, D, E, F#, G#, A# and C#, D#, F, G, A, B) that have to be arranged both horizontally and vertically.
This gives you two possible matrices:
Matrix A
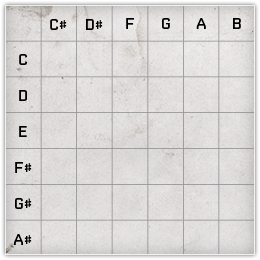
and
Matrix B
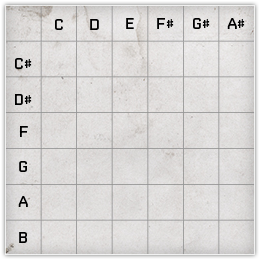
5.b Computer screen, 2nd window:
A second window opens on click of the folder icon labelled INNEN. It contains 36 files arranged in six columns and six rows. The file in the top left corner is named a.txt, and the file in the 3rd column/5th row is named 0.txt.
This tells you how the the glyphs of the plain text have to be arranged in the ADFGVX-matrix. You start in the top left corner with the letter A and continue filling the next boxes to the right with the following letters alphabetically. By doing this, you end up placing the letter Z in the space left of the one indicated by the file 0.txt. From here, you continue in the same manner with the letters 0 to 9.
The two matrices now look like this:
Matrix A

and
Matrix B
 ---------------------------------------------------------------------------------------------------------------------------------------------------
6a. Plain text
Using these matrices and the sequences of notes detected in 4 you can now find the plain text.

Solution: age of job
The second sequence of notes doesn’t deliver anything that makes sense in combination with matrix A.
6b.

Solution: age of job
The first sequence of notes doesn’t deliver anything that makes sense in combination with matrix B.
-----------------------------------------------------------------------------------------------------------------------------------------------------------
7. tea kettle
The tea kettle refers to the game of the same name that is based on the fact that some words have several meanings. The id card underneath the kettle tells you for what word a different meaning is to be found: job (the job of the cardholder is the only information the card carries. The last name is an additional clue: Kellner is the german word for waiter – also a common job.) Next to its career-related meaning, the word job can also refer to a well known biblical figure.
------------------------------------------------------------------------------------------------------------------------------------------------------------
8. Age
The bible doesn’t give any precise information about the age of Job. But in Job 42/16 it is mentioned that Job had an additional 140 years to live: https://www.biblegateway.com/verse/en/Job%2042%3A16
-------------------------------------------------------------------------------------------------------------------------------------------------------------
9. Stencil
The title of the record “Cuttin’ through the years“ is a clue that the numbers 1-4-0 have to be cut out in the matrix. By doing so, the following stencil is created (see also: en.wikipedia.org/wiki/Grille_(cryptography))
-------------------------------------------------------------------------------------------------------------------------------------------------------------
10. Applying the matrix
The matrix of the stencil has the same number of spaces as the the letter-matrix on the print-out that we can find underneath the computer. If you print out the print-out, transfer the stencil in matching dimension on paper and put both on top of each other, three spaces of the letter-matrix are visible.
In the space originally occupied by the number 0 you will see the letter “st” of the letter-matrix beneath. In the space 1 you can see the letter “l”, and in space 4 the letter “o”.
a.) Arranging these letters in the order 1-4-0 leads to the letter sequence: l – o – st
b.) Turn the stencil by 90 degrees and find the letters for 1-4-0: i – n – cy
c.) Turn the stencil by 90 degrees again and find the new letters for 1-4-0: b – e – rs
d.) Turn the stencil by 90 degrees once more and find the letters for 1-4-0: p – a – ce
This procedure is hinted by the fact that the music in this mission is played with a turntable.
The combination of letters from 10a.) – 10d.) are the solution.
Solution Code: LOSTINCYBERSPACE
Did you notice the following?
1. The note in Russian on the print-out translates to “East Berlin, Behrensstraße (use back entrance), Sergej.”
Behrensstraße is where the Russian embassy in Berlin is located at. A agent called Sergej was the first contact person for the group of hackers around Karl Koch, who were responsible for a famous cold war espionage incident in the 1980s .
2. The writing in Russian on the plaque in which the code is entered translates to “Sergej welcomes you to the back door of the Russian embassy. Please enter your entry code.”
3. Sticker on the computer screen (75ct): An accounting error of 75ct lead to the detection of the hackers by Clifford Stoll. See also: http://en.wikipedia.org/wiki/The_Cuckoo%27s_Egg)
4. The green triangle with the eye inside hints towards the illuminati or Karl Koch. His hacker name was Hagbard Celine, a character from the book series Illuminatus! by Robert Anton Wilson.
Further details about this mission can be found in the CD-booklet. (More about that in the toogle box “CD”)
MISSION 6: SUPERMARKET
Mission 6 – Supermarket
Method of encryption: Barcode 39
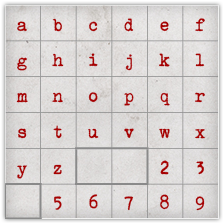
Important Clues: receipt, advertising leaflet with coordinate system (A- T, 1-10)
Hidden active and clickable areas: none
Solution method:
1.
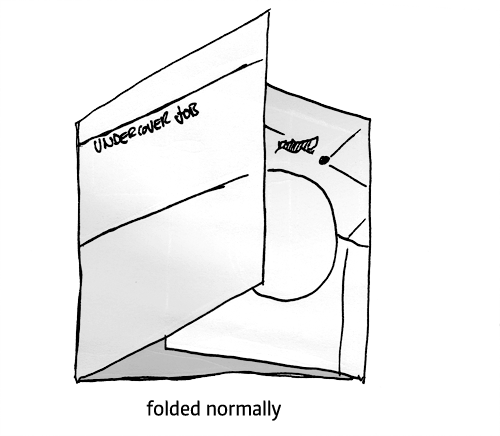
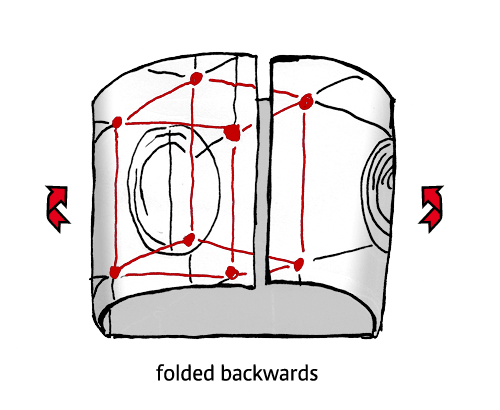
Download and print the advertising leaflet double-sided, fold the pages in the middle and arrange them according to the page numbers 1-12. The page numbers are in the bottom right or left corner of every page in a black circle.
-----------------------------------------------------------------------------------------------------------
2.
Evaluation of the receipt (lines 1-4)
The entries on the receipt can be used to identify certain spots in the leaflet. These spots are identified by the page number and two coordinates referring to the coordinate system surrounding the leaflet's pages. They are written according to the following pattern: Page number - <Comma> - letter axis – number axis. If there are several coordinates in one entry they are separated by a semicolon.
2a
First receipt entry: „READ REVERSE 2, B8“
“2” refers to page two of the leaflet.
“B8” indicates the coordinates on page two. At the spot identified by the coordinates you will read “1A”.
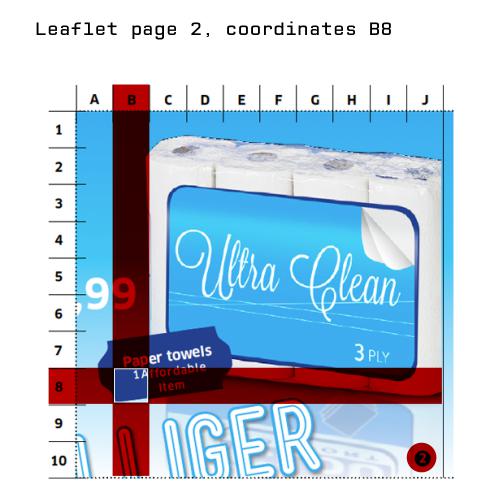
1A read in reverse (READ REVERSE): A1
You will also find “A1” in the sheet music. It marks part A1 of the composition SUPERMARKET – this part is the basis for the solution.
2b
Second entry on receipt: 1, L7; 10, E6 (-L +E)
1, L7: At coordinates L7 on page 1 you will read bar.
10, E6 (-L +E): At coordinates E6 on page 10 you will read cold. If you drop the letter “d” and add a letter “e” you get code.
This receipt entry is a clue towards a barcode.
2c
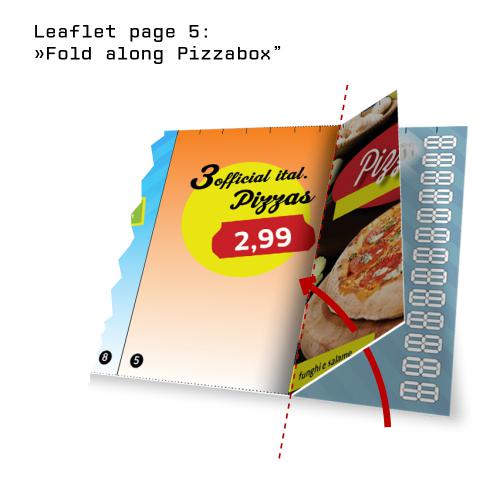
Third entry on receipt (four coordinates): 11, O6&Q4/5; 3, L6; 4, B1+4&C5, 11, M5 (-TO)
On page 11 the coordinates O6&Q4/5 read “FOLD” (O6: F and Q4/5: OLD).
On page 3 the coordinates L6 read along.
On page 4 the coordinates B1+4&C5 read PIZZA (B1: PI, B4: ZZ, C5 : A)
On page 11 the coordinates M5 (-TO) read Botox. If you drop the letters TO you are left with BOX.Everything combined gives you the hints barcode and fold along pizzabox.
-----------------------------------------------------------------------------------------------------------
3.
On page 5 of the leaflet you will find an image of a pizza box. If you fold the page along the boxes edge so that the pizza box is hidden and a ketchup bottle becomes visible instead, you will be able to read the hint 3 of 9 above the word fragment “OMATOS”.
-----------------------------------------------------------------------------------------------------------
4.
And indeed, there is such a thing as a Barcode 3 of 9 (also know as Barcode 39). It works on the basis of five black and four white alternating lines. Three of those 9 lines are thicker than the others. The plain text symbol that is being encoded is determined by which of the lines this applies to.
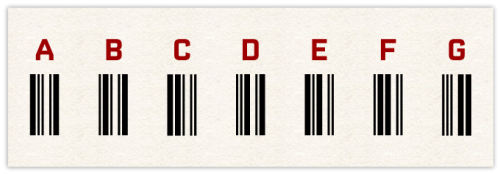
Go online and find a code table for Barcode 39, e.g. http://everything2.com/title/three+of+nine
“0” represents a thin line, “1” a thick line.
-----------------------------------------------------------------------------------------------------------
5.
Evaluation of the receipt (lines 5-7)
5a.
F->E: PW
In the previous step we found out, that barcode 39 consists of 5 vertical black lines and 4 white lines, or gaps between them. In musical notations there are five lines with four gaps as well, but these run horizontally. This allows Barcode 39 to be translated into a musical notation, or vice versa.
In the composition supermarket, this is done with the treble notes of part A1 (the clue to part A2 was given in the first receipt entry)
In the treble notes, the note „F“ occupies the top line, the note „E“ the bottom line.
F->E: PW indicates that the musical notes have to be read from the top to the bottom line. PW stands for Password.
The first bar of A1 begins with the chord E-B-G.
Note E is in the 1st gap.
Note B is on the 3rd black line.
Note G is on the 4th black line.
The lines and gaps that are occupied by notes represent thick lines in the barcode. Using this method with the chord E-B-G we get a barcode in which the 1st white line, the 3rd black line and the 4th black line are thick – three notes are now three thick lines in the barcode.
If we now refer to the encoding table for barcode 39 and look up the entry where positions 2, 5 and 7 are marked with 1 (a thick line). This appears to be the case at the symbol * (Start / Stop).
The second chord consists of the notes F-B-A.
Note F is on the 1st black line.
Note B is on the 3rd black line.
Note A is in the 3rd gap.
In the encoding table we are looking for the symbol in which positions 1, 4 and 5 (thus representing 1st and the 3rd black lines as well as the 3rd gap) are marked with 1. This is the case at the letter E.
Continuing in the same manner with the following chords gives us *EDIGMA M4*.
On page 9 of the leaflet we can find the mistyped word „Nod´t“. Switching the letter d and N gives us the word with the correct spelling: „Don´t “. Switching those letters *EDIGMA M4* delivers the correct password (PW): *ENIGMA M4*
5b.
E->F: *
E->F: * tells us that in this step the notes of the chords have to be read from the bottom to the top line.
1st chord: The notes are G-B-E.
Note G is on the 2nd black line.
Note B is on the 3rd black line.
Note E is in 4th gap.
In the encoding table we are looking for the symbol, in which positions 3, 5 and 8 are marked with a 1, representing the 2nd and 3rd black line and the 4th gap. This we find at the letter P.
2nd chord: The notes are A – B – F.
Note A is in the 2nd white gap.
Note B is on the 3rd black line.
Note F is on the 5th black line.
In the encoding table we are looking for the symbol, in which positions 4, 5 and 9 are marked with a 1, representing the 3rd and 5th black line and the 2nd gap. This we find at the number 4.
Continuing in the same manner with the following chords gives us P4593-1S-EP.
On page 9 of the leaflet we can find the mistyped word „Craz5preis – y0%“. Switching the number 5 and the letter Y gives us the phrase with the correct spelling: „Crazypreis – 50%“. Switching those symbols in *P4593-1S-EP* delivers the following: P4Y93-1S-EP
5c.
Enter X in 7, T1-10: $
At the coordinates T1-10 on page 7 we find a line drawing that looks similar to a 7-segment display. Fill in the segments of the drawings so that you can read P4Y93-1S-EP.
-----------------------------------------------------------------------------------------------------------
6.
There is an image of a lightbulb on page 7 of the leaflet, and on page 8a that of a bottle of window cleaner with the slogan “for a straight & clear see through”. Both are hints to hold the drawing on page 7 in front of a lamp and look through the paper. On page 8 there is similar drawing as on page 7 with some segments already filled out. When held in front of a light, the two drawings complement each other and the following is legible: PAY9381$SEPT3
Solution / Entering the code:
Enter ENIGMAM4 for the password. (Leave out the two asterisks (*) and the blank, as stated in the on-screen instructions.)
Enter the amount and the date at $: 9381SEPT3
(Leave the $-Sign out.)
MISSION 7: MERCURY DANCE
Mission 7 – Mercury Dance
Method of encryption: Substitution based on the number Pi
Important Clues: Various parts of the magazine (see solution method)
Hidden active areas (on mouse over): „introduction“, „aprés“, „ la grande danseuse MATA HARI....“, Car
Solution method:
1. If the cursor is moved over the word „introduction“ in the champagne advertisement, the following is marked by red circles:
- 299, 792, 485
This is a hint towards the speed of light – light travels at 299792458 metres per second. The Symbol for the speed of light is c0.
- Aston Martin 2-Litre Sports
This is a car model, also know as DB1.
- Deuterium
This is a isotope of hydrogen for which the symbol D2 is used.
- exosome complex exonuclease RRP44
This is a protein that can also be described as DIS3.
The symbols linked to the four marked spots are the first 4 notes of a chromatic scale combined with a number:
C=0
Db=1
D=2
Dis (D#)=3
Since they are found in relation to the word “introduction”, this clue is about the intro of Mercury Dance, consisting of 51 notes in total (the sheet music is accessible by clicking on the ad “le grand danseuse MATA HARI...”). All in all, there are 10 different notes in the intro:
C, Db, D, Eb (=D#), E, Gb, (F#), G, Ab, A, Bb
The first four notes of the chromatic scale have already been assigned to a number each. Continuing this method for the remaining notes that are used in the intro leads to the following:
E=4
Gb/F#=5
G=6
Ab/G#=7
A=8
Bb/A#=9
If the 51 notes from the intro are substituted by their corresponding numbers (see above) it leads to the following string of numbers:
314159265358979323846264338327950288419716939937510
The first note (Eb=3) is different from the other 50 in that it is not assigned to a chord symbol (such as Dbm6/9 or Cm7#11) or to a time signature (such as 5/4, 6/4 ). Separating the digit 3 from the other by a comma leads to the number pi.
3,14159265358979323846264338327950288419716939937510
2. The ad titled „nouvelle elasticité“ on the third magazine page contains the following clue:
←A→horizontal, ↑B↓vertical = first horizontal, then vertical
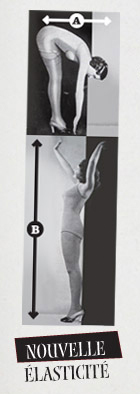
This refers to the letter matrices that can be found on pages 1 to 3 of the magazine and to the order that has to be followed when decoding them.
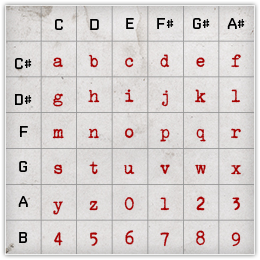
3. Moving the cursor over the car on the same page shows an arrow that points to the syllable com.
This car has the number 788261 written on its door. The number consists of six digits, or three double digits: 78,82,61. Those double digits are to be used in the letter matrix 3 according to the instructions on the same page (first horizontal, then vertical - see 2)
78: the box in column seven, row eight contains the letter U.
82: gives the letter R.
61: gives the letter L.
URL is an abbreviation for Uniform Resource Locator, commonly also known as a web address. The letter strings com and URL indicate that a web address is to be found.
4a. Magazine, Page 1, Aspirine Ad
When moving the cursor over the word "avant“ (“in front of” in french) several other words are highlighted that read combined "Allez chez vir-gule“. („Go to comma“ in french) In French and most European languages, the comma is used as a decimal point, so it is the digit in front of the comma in Pi (3) which is relevant now. This points to the third letter matrix.
4b. Magazine, Page 1, CACAO-Ad
Moving the cursor over the word „après“ (“after” in french) causes several other parts of the magazine page to be highlighted: the words „yeux“ („Eyes“) and „pair“, and an illustration of two Earrings.
This indicates that the digits of pi after the comma are to be used in pairs.
5. Turning to letter matrix three and using the digits after the decimal point in pi as coordinates works like this:
14 (1 horizontal, 4 vertical) = S
15 = A
etc
Continuing with the digits leads to the following result: SAMEDIASEIZEHEURESAUMUSEEGUIMETFIN
(SAMEDI A SEIZE HEURES AU MUSEE GUIMET FIN)
It has been established earlier that the result is a web address (see 3)
Entering www.SAMEDIASEIZEHEURESAUMUSEEGUIMETFIN.com in a browser will show you a scene with multiple images of Mata Hari. (You have to be logged in to www.undercover-job.com to be able to see the site.)
6. Next to the letter matrix on page 2 of the magazine there is a pricing table. All the amounts in the table have two digits in front of and after the decimal point. As in 5, those pairs of digits can be used as coordinates in the letter matrix on the same page. (Another clue towards that can be found in the illustration “L'homme ideal”
22 =T
19 = U
32 = D
52 = I
etc.
Continuing with the digits leads to the following result: TUDISCELAPEUTARRIVERATOUTLEMONDE
(TU DIS CELA PEUT ARRIVER A TOUT LE MONDE)
7. According to its instructions, names of countries have to be found in the letter matrix on page 1. In total there are fourteen:
BRESIL, CANADA, CHILI, COLOMBIE, EGYPTE, GRECE, HOLLANDE, HONGRIE, MEXIQUE, NORVEGE, POLOGNE, SUEDE, SUISSE and TURQUIE
Those countries can also be found in the pricing table on the left hand side of the same page. Using the amounts assigned to those countries as coordinates in the same way as in the other letter matrices (see 5 and 6) leads to the following result: JEDISILADORELAMUSIQUEMODERNE
(JE DIS IL ADORE LA MUSIQUE MODERNE)
Solution:
In the scene found at www.SAMEDIASEIZEHEURESAUMUSEEGUIMETFIN.com every photo of Mata Hari can be clicked, each opening two speech bubbles. One of them is titled “Je dis ...” (I say) and contains a sentence in french, the other one is titled “Q´est-que dis-tu?” (“What do you say”) and has a field to be filled out.
For one of the photos, the 1st bubble contains the sentence „Il adore la musique moderne“, which what has been identified in letter matrix 1. The sentence from letter matrix 2 has to entered in the corresponding other bubble (leaving out “Tu dis”the blanks):
CELAPEUTARRIVERATOUTLEMONDE
Did you notice the following?
1. The symbol for pi is also used as the formula symbol for permutation. A permutation can be found in part A1 of Mercury Dance: the order of the notes G, Bb, C and D is changed in every measure.
2. The following drinks are hidden in letter matrix 2:
VIN, RINCETTE, EAU GAZEUSE, THE, CAFE, JUS, LAIT, LIQUEUR and LIMONADE.
In the matrix there are four boxes that belong to both the sentence TUDISCELAPEUTARRIVERATOUTLEMOND and to the drinks. Together, these boxes form a square and thus a contrast to pi (which describes a circle's circumference.) The letters in theses boxes are N-E-I-R, which in an Anagram for “rien” (“nothing” in french) – a dead end leading to nothing.
3. Letter matrix 3 is more complex than the two others. Some boxes contain two letters, and the words that are hidden sometimes change the direction they are read in. An example for this is MONTGOLFIERE: The word begins with the letter M from the Box with the coordinates 92 and continues like this: O = 91, N = 90, T = 90, G = 91, O = 92, L = 93 etc
The following methods of transportation can be found: TRIPORTEUR, VOITURE, MONTGOLFIERE, MOTO, AVION, BATEAU, VELO, LITIERE
4. A binary code is used in part A1 of Mercury Dance starting at measure 11: A note or a chord represent 1, a break represents 0. Using that method, the notes set in a measure of 5/4 read 10110, the notes set in a measure of ¾ read 111.
10110 transferred to decimal number is 22, 111 is the number 7 in the decimal system.
The fraction 22/7 is an approximation to Pi.
MISSION 8: THE OLD GAME
Mission 8 – The Old Game
Method of encryption: Substitution
Important Clues: Lettering on container J=I; Letters and numbers on scrap of paper found in the chest pocket of Bascrobat’s coat; red sequence of letters and numbers that is partly being covered by the note „count and add“; matrix of numbers and letters in Taxis room; scissors and glue; pieces of paper in Taxis coat pocket, in his right hand and next to him on the ground
Hidden active areas: Small portrait images (upper left corner); container in 002 1/2’s screen (the second from the right at the bottom); chest pocket of Bascrobat’s coat; tape recorder; notepad underneath the tape recorder; sheet of paper in Bascrobat’s hands; note in Taxi’s coat pocket; note in Taxi’s hand; notepad on the window ledge in Taxi’s room; scissors and glue window ledge Taxi’s room; note next to Taxi on the ground; sheet of paper pinned to the wall in Taxis room
Solution method:
1. 0021/2 screen: Clicking on the bottom second container from the right opens a photo with a detailed view of its lettering. Here, the first important clues can be found: I=J and V=U
_____________________________________________________________________________________________________________________
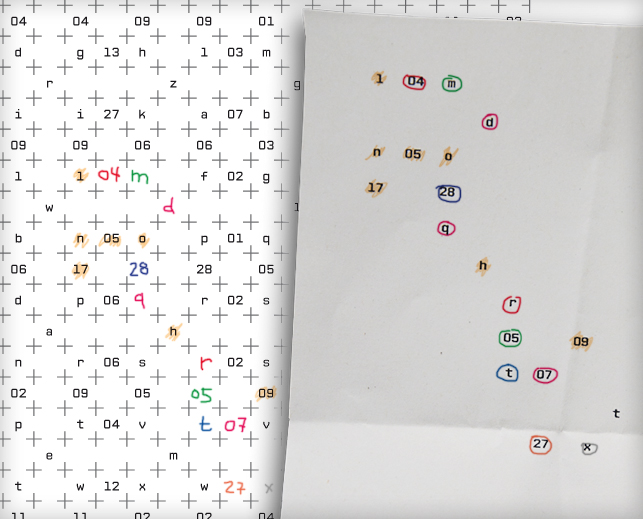
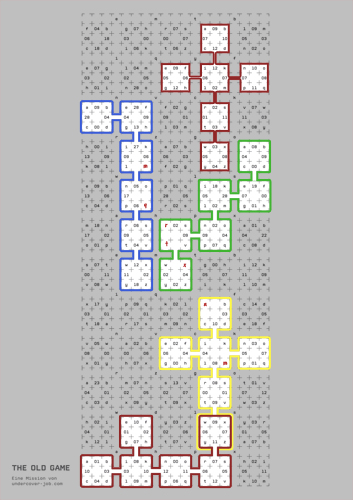
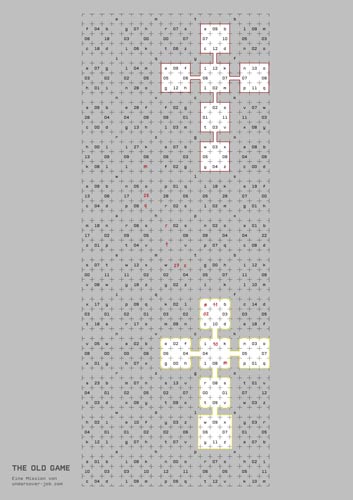
2. Taxi’s room: Download and print the matrix of numbers and letters (found on the sheet of paper pinned to the wall).
Inspecting the matrix reveals:
a.) The first row, and after that every fourth row, contains only four letters. All other rows contain more.
The following letters can be identified in those rows (Two positions in the Matrix are empty):
e – m – t – b
i – q – y – f
n – v – c – k
r – z – g – o
w – – l – s
a – h – p – x
e – m – t – b
i – q – – f
n – v – c – k
r – z – g – o
w - d – l – s
a – h – p – x
b.) This sequence of letters repeats after row six (only counting rows with fewer letters).
c.) In row five of those letter sequences (row 17 of the full matrix) a letter is missing after the letter “w” (8th column). At the corresponding position in the repeated letter sequence (row 11 / row 29 of the full matrix) the letter “d” can be found.
d.) Following the clue I=J and V=U, it can be determined that this sequence of letters consists of every 7th letter of the alphabet.
e.) In the remaining part of the matrix there are 60 squares consisting of letters and numbers. Each has 4 letters in the corners, 4 numbers in the middle space along the edges and an empty space in the centre.
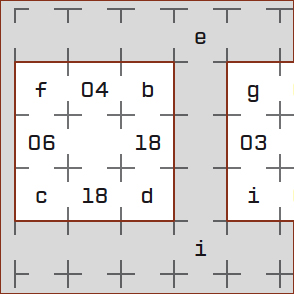
f.) In several squares, some numbers and/or letters are missing.
_______________________________________________________________________________________________________________________
3. Bascrobat’s room: By clicking on the note in the chest pocket of Bascrobats coat, it is enlarged and a seemingly random array of numbers and letters can be read. Those are the missing letters and numbers of the matrix on the wall in Taxi’s screen. (Among others, the missing letter “d” can be found here, too – see 2.c)
These letters and numbers are entered in the matrix found in Taxi’s room.
____________________________________________________________________________________________________________________
4. Taxi’s room: Clicking the notes in Taxi’s hand and in his coat pocket reveals two drawings: (A-Z and Do/Don’t).
These are clues telling us to search the matrix for squares that touch each other horizontally, vertically or diagonally and in which all letters of the alphabet appear. (Again, I=J and V=U has to be applied here). This will be the case for six connecting squares at a time. (By the way: Squares that are connected can also be found in the window of Taxi’s room and in 002 ½’s screen)
This search gives us the following result:
_________________________________________________________________________________________________________________
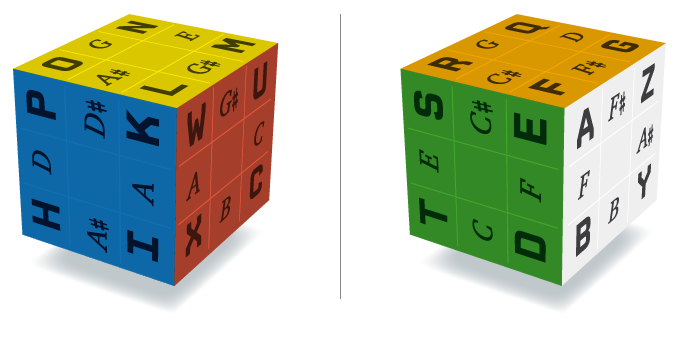
5. Taxi’s Room: Clicking on the note next to Taxi on the ground opens an oddly shaped piece of paper that resembles the shape of a cube:
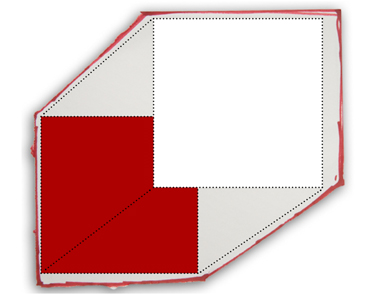
In combination with the scissors and the glue from the window ledge, this is a clue that we are looking for a combination of squares in the matrix that can be folded into a cube.
 ______________________________________________________________________________________________________________
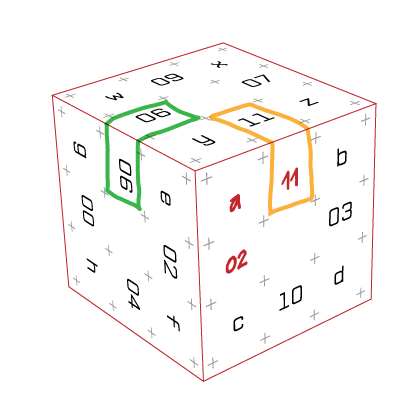
6. Cut out both segments of the matrix and assemble them into a square. After doing so, there will be two numbers that meet on each side of the cubes. But only in one of the two cubes the respective numbers will be identical. This is the case with the cube resulting from the bottom square combination.
 ___________________________________________________________________________________________________________________
7. The numbers on this cube are the numbers from 0 to 11. Clicking on the sheet of paper that Bascrobat is holding, it is enlarged and overlaps the red sequence of number and letters. To the left of the enlarged paper we can read “cero”. This is a clue that the number zero is assigned to the note “c”.
To the right of the enlarged note we can read “01”, and on the note itself (and thus in between “cero” and “01”) we can read “count + add”.
In 2d.) we established that every 7th letter is of relevance. Transferring the interval of 7 notes to a chromatic scale, the 7th note starting from C is G. (C#, D, D#, E, F, F#,G)
In other words:
Number „0“ corresponds to note „C“.
Number „1“ corresponds to note „G“.
Looking for the note corresponding to number “2”, we count seven notes up from G: G#, A, Bb, B, C, C#, D
Number „2“ corresponds to note „D“.
Continuing in this manner we get the following result for the remaining numbers and notes:
3=A
4=E
5=B
6= F#
7=Db
8=Ab
9=Eb
10= Bb
11=F
__________________________________________________________________________________________________________________
8. Taking another look at the cube, you can detect that on every side of the cube every letter is enclosed by two numbers – or two notes. For instance, the numbers 02 and 11 – or their corresponding notes D and F – enclose the letter “a” (see the image at 6.)
The following sequence of notes makes up the melody of the composition “the old Game”:
G, B, D, F#, Bb, D, Eb, G, B, A, E, Bb, D, F, B, A, A, Db, A, B, C#, A, G#, E, D, F#, Eb, C
The notes are now grouped into pairs and substituted by the corresponding numbers. The letters that are enclosed by the resulting pairs of numbers make up the solution for the mission:
G/B =01/05=p
D/F#= 02/06=e
Bb/D=10/02=c
Eb/G=09/01=v or u
B/A=05/03=n
E/Bb=04/10=i
D/F=02/11=a
B/A=05/03=n
A/Db=03/07=o
A/B=03/05=n
C#/A=07/03=o
G#/E=08/04=l
D/F#=02/06=e
Eb/C=09/00=t
Solution: PECUNIANONOLET
Did you notice the following?
1. PECUNIA NON OLET is a latin phrase that translates to “money does not stink”
2. No 7: The sequence C, G, D, A, E....etc. can also be found in the Circle of fifths.
3. No 1 and No 8: The letter V is used in many latin inscriptions instead of the letter U.
MISSION 9: THE NEW GAME
Mission 9 – The New Game
Method of encryption: Polyalphabetic cipher
Important Clues: Image cut up into 54 pieces; icons; Euro-Coin; Leaf; tea bag; broken green plastic ring; key; feather; piece of paper torn out of newspaper; wire; curb; lines on tarmac; 11 coloured squared; crown cap; popsicle stick; valve stem from a bicycle; light bulb; tram ticket; button; cigarette butt; twig; walnut; gap between paving stones; Rubik’s cube in 002 1/2’s Hand; lettering on crane’s cabin (0-255)
Hidden active areas: Four rectangles with picture details, briefcases (in Bascrobat’s hand and in front of the cut up image); letter in Retlow’s hand
Solution method:
1 Click the top left rectangle on the main page of the mission. A new window will open and reveal an image that is cut up into 54 pieces. There is a briefcase in front of it at the bottom right. Click on the briefcase, and you will see an image of tarmac, a curb and various small objects.
Here’s how to read this image: The curb, the little twig, the two lines on the tarmac and the wire represent the black keys of a piano, the space between them represent the white keys. The broken plastic ring on the curb looks like the letter C. This tells us that the curb stands for the note C. The coin lies on the edge of the curb, and thus marks the first black key, which is C#. The space between the curb and the twig thus stands for the note D. The twig with the leaf lying on it represents the second black key D#. The dividing line between the smooth and the rough-textured tarmac is the division between the keys E and F on a piano. Thus, the tea bag marks the note F#, the key marks the note G# and the torn piece of paper with the letter A on it marks the note A. The feather lies on the marker for the 5th black key, the note A.
This gives you the following relation between notes and objects:
C# – euro coin
D# – leaf
F# – tea bag
G# – key
A# – feather
The plastic ring and the piece of paper are of no further relevance in this mission. They are only clues to help positioning the notes on the tarmac-keyboard.
_____________________________________________________________________________________________________
2. Click the bottom left rectangle on the main page of the mission. A new window will open and reveal an image in which you will also find a briefcase. Click on it to open a new image, again with several small objects, this time lying on a sand and paved ground
Here’s how to read this image:
The grey twig, the horizontal gap in the pavement, the blade of grass, the upper pavement border and the popsicle stick represent the five lines of a stave. Thus the button, which is lying in the bottommost space, corresponds to the note F, the cigarette butt on the gap (and therefore the second line from the bottom) translates to the note G, etc.
This gives you the following relation between notes and objects:
F – button
G – cigarette butt
A – tram ticket
B – light bulb
C – valve stem
D – walnut
E - crown cap
_________________________________________________________________________________________________________
3. Make a screenshot of the cut up image that is linked to the top right rectangle of the mission’s main page. Cut it into 54 pieces and rearrange them to make an intact image.
You can now see a pattern consisting of six smaller groups of icons and arrows. In each of them, four icons are arranged around one set of crossed arrows. Each of the icons can be associated with one of the objects (and thus with a note) from 1) and 2).
![]()
If you now switch the icons as indicated by the arrows and replace them with the corresponding notes you will end up with the following:
(img 1)
 _______________________________________________________________________________________________________________
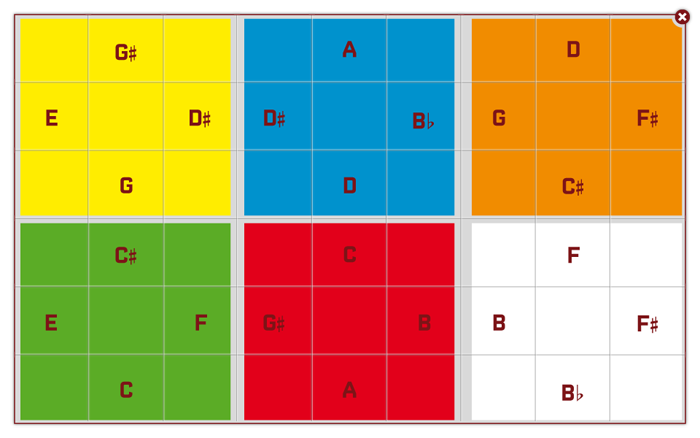
4. Click the top right rectangle on the main page of the mission. A new window will open and reveal an image with eleven squares in different colours that are arranged in two rows on top of each other. For this mission, their colours are relevant.
Colours on a computer screen are generated by mixing red, green and blue (=RGB) in different ratios. Thus, any colour tint can be identified by specifying the parts of red, green and blue of which it consists. The portion of the single colours is usually indicated by a value between zero and 255. The lettering on the crane’s cabin (0-255) is a clue towards this.
Now determine the RGB values of the eleven squares with a colour measuring tool such as this https://addons.mozilla.org/de/firefox/addon/colorzilla. Pay attention only to the decimal values. Every number you have determined can be translated into a letter by using an ASCII table (also consisting of digits from 0 -255).
89 (Y) 108 (l) 66 (B) 101 (e) 79 (O) 110 (n)
101 (e) 110 (o) 108 (l) 255 (-) 114 (r) 108 (g)
108 (l) 119 (w) 117 (u) 255 (-) 97 (a) 101 (e)
71 (G) 101 (e) 82 (R) 87 (W) 116 (t)
114 (r) 110 (n) 101 (e) 104 (h) 101 (e)
101 (e) 255 (-) 100 (d) 105 (i) 255 (-)
You get the following colours:
Yellow Blue Orange
Green Red White
These colours can be found on a Rubik’s cube (just like the one that an agent is holding in the image accessible via the bottom left rectangle of the mission’s main screen.)
Transfer the colours and their arrangement to the matrix you have identified in 3.) (img 1)
 (img 2)
_____________________________________________________________________________________________________________
5. Label the sides of a Rubik’s Cube according to this image.
______________________________________________________________________________________________________________
6. Note that you have just come across a cube that has been labelled with notes – just as in mission 8. There, the plain text letters were placed in the corners of each side of the cube. At this point, these are still missing for mission 9, but you just found out about how to label the middle tiles of the cube’s edges
Further, what makes a Rubik’s Cube special is that its sides can be altered. It seems likely that this will play a role in the further decoding of the mission.
6a. News, Mission 9, #2.
There are no clues within the mission towards the placement of the letters on the cube because early during Undercover Job, headquarters was assuming that clever co-agents would be able to write a software to break the code. This hasn’t happened, and clues have been released in the news section of undercover-job.com.
One of those clues was a labyrinth with the inscription 59-95.
First, find your way through the labyrinth. Next, imagine overlaying the labyrinth with a grid consisting of cells of the same width of the labyrinth’s paths. If you now count every cell of the grid you pass on the way through the labyrinth as one step, steps 59 and 95 will identify the segment of the labyrinth you want to have a closer look at. In this segment there are several icons that can easily be associated with a colour also be found on a Rubik’s Cube.
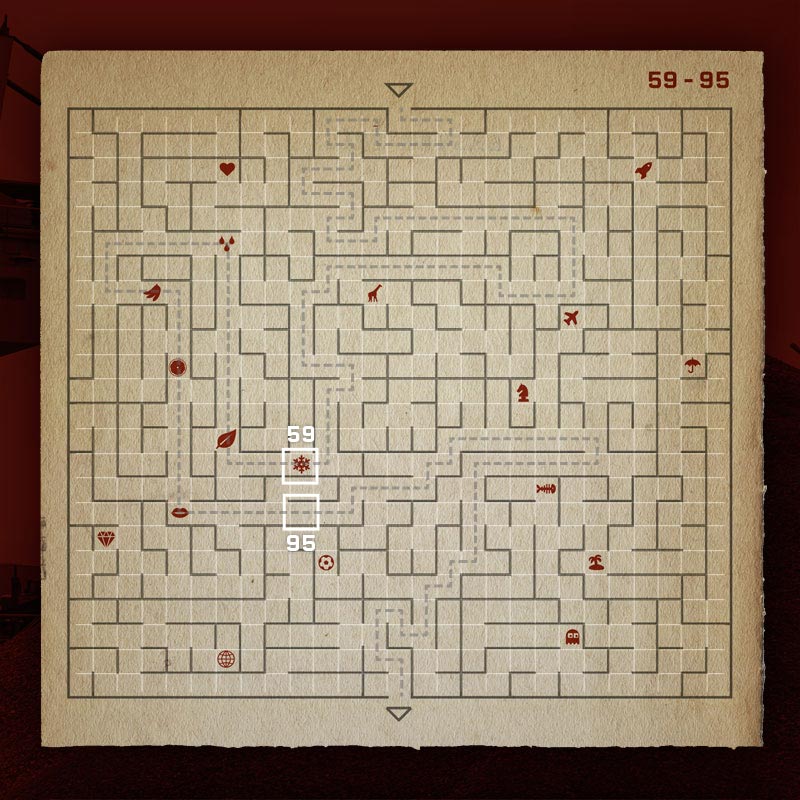
snowflake – white
leaf – green
drops of water – blue
bananas – yellow
orange – orange
lips – red
Draw squares around the icons in the respective colours in a way that
- there is only one icon in each square
- the squares touch each other but don’t overlap
- the resulting shape can be cut out and folded into a cube.
Again, this method has similarities to mission 8.
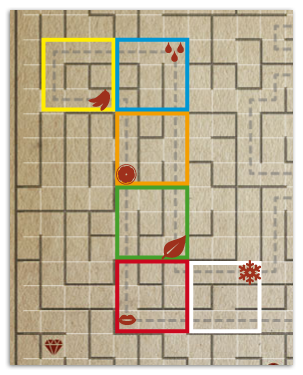
The way through the labyrinth tells you how to distribute letters on the sides of the Rubik’s Cube. Begin with the letter “A” at the snowflake (the entry point of the labyrinth’s way through the shape you’ve drawn). Then follow the way and distribute the other letters in alphabetical order along it. Remember to only use the corner positions of every square. Also, the rule of I=J and U=V from mission 8 is still in effect, reducing the alphabet to 24 letters.

The Rubik’s Cube with complete labelling will look like this:
6b.
Another clue has been posted in the news section of undercover-job.com. Is is a simple puzzle in which a grid of squares has to be assigned to a cube.
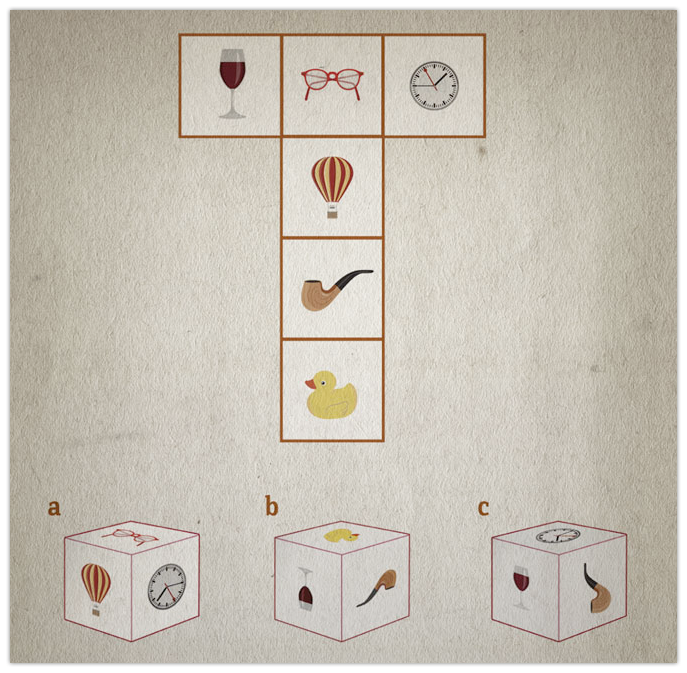
The correct answer is a, but it has a flaw: the hands of the watch are pointing in the wrong direction – they are turned by 90 degrees to the right. This is a clue that the Rubik’s Cube has to be rotated just the same way, by 90 degrees to the right.
Solution:
Just as in mission 8, the corner positions of the sides of the Rubik’s Cube are identified by the tiles in the middle of the cube’s edges enclosing them.
The first two notes of “The New Game” are D and Eb/D#. They can be find on the blue side of the cube and enclose a corner tile. This tile is labelled with the letter “P”. This is the first plain text letter.
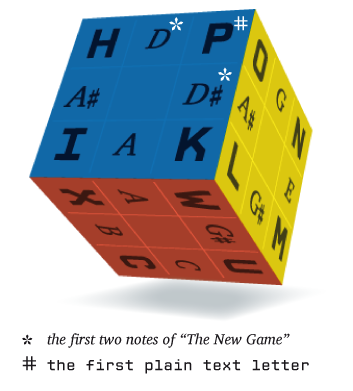
Hold the cube in way that the letter “P” is in the top right corner tile when looking from above. The red side will be pointing towards you, the yellow side is on the right. (Note: Three other positions for the letter “P” are possible – bottom right, top left, bottom left. Trial and error will reveal that none of these positions yield a solution that actually makes sense.
Now turn the right side of the cube by 90 degrees to the right / forward.
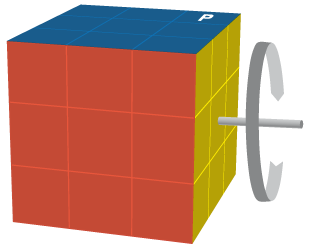
If you now look onto the cube from above you will see in the top right corner - the same spot at which the letter “P” was positioned at first – the letter “W”
The next two notes of “The New Game” are F and F#. They are on the white side of the cube and enclose the plain text letter “A”. Again, hold the cube in a way that this new plain text letter “A” will be in top right corner when you look at the cube from above. Turn the right side of the cube by 90 degrees to the right / forward as you did before.
Continue to do this until you have identified all the plain text letters. Remember that the newly detected letter has to be at the top right position before you rotate the cube’s side.
You will end up with this solution:
PATETOMNIBUSVERITAS
(lat.: PATET OMNIBUS VERITAS; En.: Truth lies open to all.)
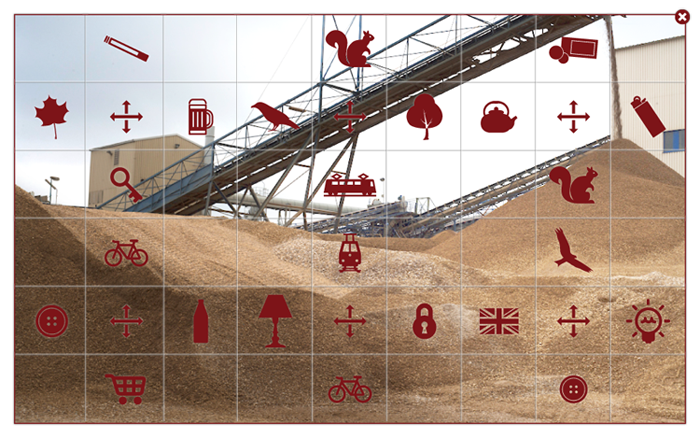
Submitting your solution code is different in mission 9 than before. If you click “break the code” you will see this coded email address:

You have found out earlier that
- the lighter represents the note / the letter “G”
- the bottle represents the note / the letter “E”
- the bicycle represents the note / the letter “C”
- the squirrel represents the note / the letter “D”
- the glass of beer represents the note / the letter “E”
In combination with the letters “T” and “O” (also depicted) you get the email address getcode@undercover-job.com
Sending an email to this address before depot 2BSTX has been found triggered an auto response message. The solution didn’t have to be included, an empty mail would have been enough. In the auto response message, agents were given a postbox address to which they had to send a letter or a postcard with the solution code PATETOMNIBUSVERITAS. The first one to send the code to this postbox received the depot’s content: 500 Euro.
If you send an email to this address now you will get an auto response message telling you that depot 2BSTX already has been found.
But what’s with the bottom right rectangle on the mission’s main page?
Click on this rectangle to find an image with the beginning notes for a song by composer H. Retlow, a warehouse with the lettering KCAB DRAW and a shady agent holding a letter.
KCAB DRAW (BACK WARD) and H. Retlow (H. Wolter) point to the clue: backwards
You can find the complete melody in two posts in “news” (Mission 9, #1.1 and #1.2)
Click on the letter in the agent’s hand and find documents that reveal the purpose of this part of the mission: the verification of the password. This verification makes sure that the solution you have found is the only correct solution to this mission.
Solution for the password verification:
Take the Rubik’s Cube, fully labelled with letters and notes. Taking the clues for backward into account, rearrange the placement of the notes in the reverse order of a chromatic scale. Replace note “C” with note “B”, note “C#” with “Bb”, note “D” with “A” etc.
The first two notes of H. Retlow’s composition are B and G and identify the plain text letter “T” as described earlier.
Hold the cube in a way that the plain text letter “T” will be in the top right corner when looking at the cube from above.
Next, turn the right side of the cube backward by 90 degrees – towards you (not forward / away from you as you did before).
The next two notes of the composition are B and F#. They identify the plain text letter “D”.
Again, hold the cube in a way that the plain text letter “D” will be in the top right corner when looking at the cube from above. Turn the right side towards you and find the notes B and E. You get the plain text letter “W”.
Continue with the remaining letters of H. Retlow’s composition and end up with this solution:
TDWACENESSUICULTDW
(TDW aceneS suicuL tdW)
The letters TDW (WDT read backwards) are so-called fillers. In cryptography fillers are used to confuse anyone who tries to break a code. Several posts in “news” point to WDT: WINNERS DON´T TIRE (04/08/.2014); WINNERS DESERVE THIS (05/08/.2014); WINNER’S DAY TODAY(06/10/2014)
The letters in between the fillers (ACENESSUICUL) read backwards give you LUCIUS SENECA – the author of the quote PATET OMNIBUS VERITAS.
BONUS MISSION: FACE F-U-T-E-N-E-R-O
Bonus mission: FACE F-U-T-E-N-E-R-O
Method of encryption: Substitution; modified Caesar cipher
Important Clues: Doodles on bridge; BURN ME; red drawings on the bus schedule; dial of the radio; lettering „The new songster“ on the radio; mention on the mission’s introduction page that, in order to solve the mission, it is necessary to play an instrument or sing directly form written musical; Name of the composition FACE F-U-T-E-N-E-R-O
Hidden active areas:
Scene at bridge: second steel beam from the left; bus at the horizon; envelope
Scene at bus stop: radio behind the windscreen; bus schedule; bridge in the bottom left corner
Solution method:
1.
The contact person at the bridge is holding an envelope that can be enlarged on click. When looking closely, you can tell that the stamps of the envelope are in a different order in the small and the large view – a clue towards an anagram.
The writing on the envelope – BURN ME – is an anagram for NUMBER.
________________________________________________________________________________________________________
2.
On the bus schedule, the following letters are circled in red: F-u-t-e-n-e-r-o. As indicated by the clues from the envelope, you are looking for a number that can be made by an anagram from these letters. The only possible solution for this is Fourteen.
_________________________________________________________________________________________________________
3.
Doodles on one of the bridge’s steel beams
3a.
„Gaius Julius“ is a clue towards Caesar cipher.
3b.
Only the first two stick figures have eyes. The eyes can be interpreted as musical notes. The first figure’s left eye is crossed by a line. In the context of musical notation, this can be read as a ledger line. The note on the first ledger line in the treble key is “C”.
The first figure’s right eye is similar to the first one. But next to it on the right there is the following symbol: # This symbol is called “sharp” in musical notation. Applied to the right eye, we get the note “C sharp (C#)”.
The two eyes of the second figure are positioned beneath a line. This line doesn’t represent a ledger line, but the bottom line of the staff. Thus, the third eye represents the note “D”. Again, there is a sharp-symbol next to the fourth eye, thus making it a “D#”.
The doodles of the first two figures give us the notes C, C#, D, D#.
The four remaining stick figures don’t have eyes, leaving us with eight missing eyes. If we again connect the eyes to musical notes, we are missing the notes E, F, F#, G, G#, A, A# and B. This succession is that of a chromatic scale as begun by the notes C, C#, D, D#.
All in all, four notes are visible, the remaining eight are missing. It is notable that the composition FACE F-U-T-E-N-E-R-O’s title consists of 12 letters of which only the first four make any obvious sense. The notes C, C#, D, D# seem to have a relation to the letters F, A, C, and E.
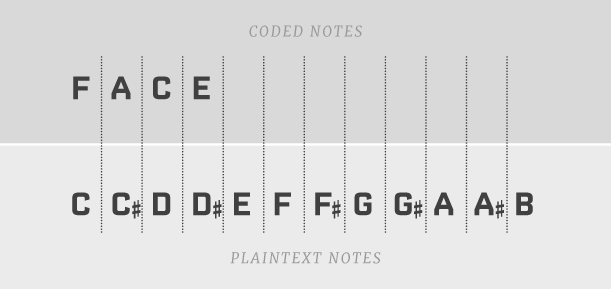
Assign the notes to the letters as follows:
Note C corresponds to the letter F.
Note C# corresponds to the letter A.
Note D corresponds to the letter C.
Note D# corresponds to the letter E
____________________________________________________________________________________________________
4.
The letters F, A, C and E can also be read to identify musical notes. The above list can thus also be interpreted as follows:
Plaintext note C corresponds to coded note F.
Plaintext note C# corresponds to coded note A.
Plaintext note D corresponds to coded note C.
Plaintext note D# corresponds to coded note E.
The remaining eight coded notes C#, D, F#, G, G#, A, A# and B don’t have a correlation to the remaining eight plaintext notes E, F, F#, G, G#, A, A sharp and B yet.
5.
Some of the letters of the composition’s title (F-U-T-E-N-E-R-O) don’t exist as names for musical notes (U, T, N, R, O), so there has to be a different way of identifying the relation to the eight remaining plaintext notes. The system in which the letters of the anagram F-U-T-E-N-E-R-O / F-O-U-R-T-E-E-N are switched comes to mind.
The letter F – the first plain text letter – corresponds to the first coded letter.
The letter O – the second plain text letter – corresponds to the eighth coded letter.
The letter U – the third plain text letter – corresponds to the second coded letter.
The letter R – the fourth plain text letter – corresponds to the seventh coded letter.
The letter T – the fifth plain text letter – corresponds to the third coded letter.
The letter T – the sixth plain text letter – corresponds to the sixth coded letter.
The letter E – the seventh plain text letter – corresponds to the fourth coded letter.
The letter N – the eighth plain text letter – corresponds to the fifth coded letter.
Graphically, this looks as follows:
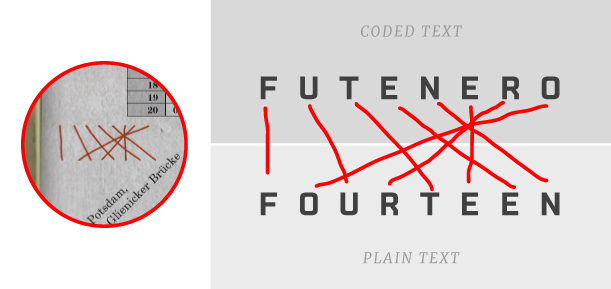
The resulting constellation of lines can also be find as a doodle on the bus schedule. It is the key to the order that the remaining coded notes have to be in.
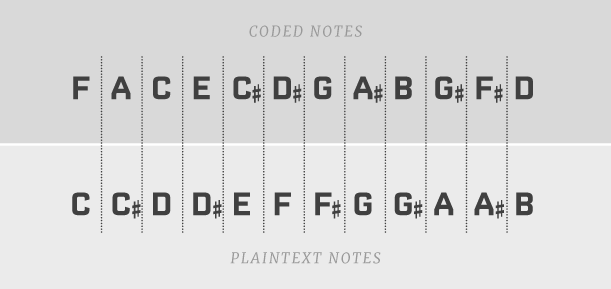
Transfer this system to the correlation of the remaining eight coded notes (see 4.)
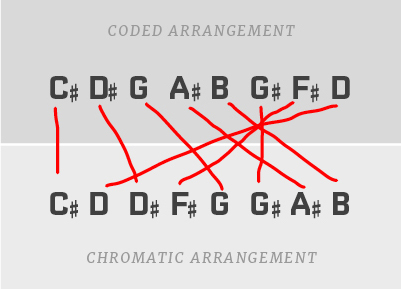
Enter the coded arrangement of the remaining coded notes into the table from 4.
6.
Now, substitute the notes from the melody of the composition FACE F-U-T-E-N-E-R-O according to this table.
The first two notes G are changed into the notes F#.
The third note Bb (=A#) is changed into the note G.
Continuing this leads to the following melody:
If you now play this melody on an instrument or sing it, you might recognize melody of “Ode to Joy” by Beethoven (The composition is originally in a measure of 4/4, but the coded note melody is in a measure of ¾.)
____________________________________________________________________________________________________________
7.
The radio labelled “The new songster”, its dial with the numbers and once more the anagram clue from the envelope (NUMBERS) indicate to put the lyrics of “Ode to Joy” in relation to a number – namely fourteen – as it has been repeatedly mentioned within the mission.
The fourteenth word of “Ode to Joy”s lyrics is Zauber (German for “magic”).
Solution: ZAUBER
Did you notice the following:
The bridge on which the mission takes place – Glienicke Bridge in Berlin – is famous for several cold-war prisoner exchanges between the Soviet Union and the USA/West Germany that took place in the 1960s and 1980s.
The first stamp on the envelope depicts Glienicke Palace, which’s current appearance was designed by Karl Friedrich Schinkel (he is on the second stamp), who also designed plans for alterations to the Glienicke Bridge.
The third stamp depicts Rudolf Ivanovich Abel, an agent involved in one of the prisoner exchanges. (http://en.wikipedia.org/wiki/Rudolf_Abel?oldformat=true)
The initials bs by the doodles on the bus schedule and the bridge are Bascrobat's (see mission task).
COVER
CD-Cover/Booklet/Label
Hidden messages can not only be found in the missions on undercover-job.com, but also on the CD cover, its booklet and the CD label. These messages give some extra clues for the missions’ solutions, but the missions can be decrypted without them as well.
---------- The Booklet ----------------------------------------------------------------------------------------------------------
1.
On the inside left page you will see a pony depicted in front of the leaning tower of Pisa.
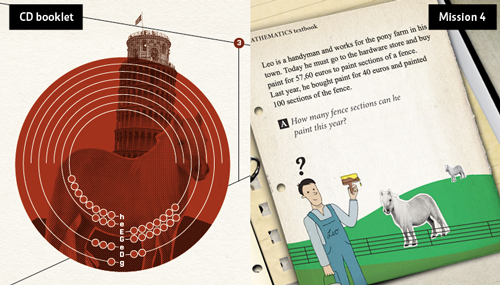
You also can find the pony in the math problem of mission 4. There, you are asked to figure out how many fence segments handyman Leo will be able to paint. The solution is 144.
Both “Leo” and “Pisa” are parts of the name of famous mathematician Leonardo da Pisa, also known as Fibonacci. The number 144 is part of the fibonacci sequence, so all in all, this is a clue, that the fibonacci sequence is important for decrypting mission 4 (see also solution for mission 4)
2.
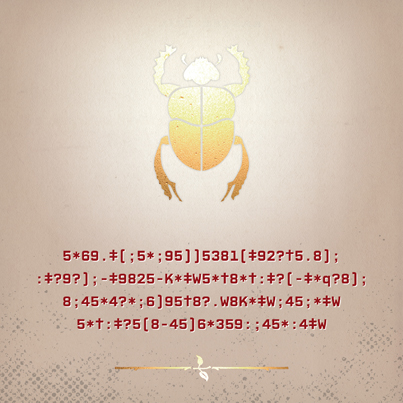
On the inside middle and right inside pages, you will find the following sequence of numbers, letters and symbols:
5*69.‡(;5*;95))5381(‡92?†5.8);
:‡?9?);-‡9825-K*‡W5*†8*†:‡?(-‡*q?8);
8;45*4?*;6)95†8?.W8K*‡W;45;*‡W
5*†:‡?5(8-45)6*359:;45*:4‡W
They are a basis of the so-called Gold Bug cipher. The Gold Bug is a short story by Edgar Allan Poe, part of which is the decryption of a secret message using these symbols. With this cypher, the above mentioned message can be decrypted as well. It reads in plain text:
An important massage from Budapest:
you must come back now and end your conquest!
Ethan Hunt is made-up, we know that now
And you are chasing a myth anyhow.
(The coding person made a funny mistake in the first line: instead of massage, it should read message.)
This little poem is a clue towards mission 2, in which the location of agent 002 ½ has to be be found. The solution is El Dorado – a myth.
It contains the same secret message, along with a more obvious clue toward the gold bug cipher.
3.
On the middle and right page of the booklet, you will find a number sequence, beginning with 59230 ...
These number are the digits of pi from the 50th decimal places on – they tell you that in one of the missions, pi will be part of the solution (see solution for mission 7)
4a.
On the left page on the back of the completely unfolded booklet you will find an image of a belly dancer, along with this secret message:
YA OAEDMFDM
Hausa umvia Smmuv uftoa xadas umava
uvtdv aeowm upguh moimu palfy gfdmj
gvtcd igxte pgfuv mmecg fevut md.
The belly dancer points to mission 7, in which Mata Hari plays an important role.
The secret message has been encrypted with an extended Caesar cipher. The key to the cypher is the credit text behind the CD. Both the secret message and its key are marked with an old fashioned illustration of a pointing hand at the beginning. The credit text reads as follows:
„All compositions by Henning Wolter; all arrangements by Wolter, Matheeuwsen and van Cleef; recorded on 1 – 3 Nov. 2010 by Christian Heck (Loft, Cologne);
mixed by Marcel van Cleef; mastering by Christoph Bette (Mango Studios, Cologne); produced by Henning Wolter; Marcel van Cleef plays Odery Drums, Schlagwerk Percussion, UFIP Cymbals, Ice-stix, Inear and RMV.
Design by Benjamin Brandt (www.extrabrandt.de); Photos by Silvia Kröger-Steinbach (www.fotografie-steinbach.de) additional images: gary718/123RF.com, shutterstock/Eric Isselee, RetroAtelier/iStockphoto; typeface: CP Mono by liquitype.com“
Proceed as follows to find the alphabet of the secret text (ignore any capitalization of words):
Letter A, the first letter of the alphabet (first plain text letter), is assigned to the first letter of the credit text. This is the letter A (from the word All).
Letter B, the second letter of the alphabet (second plain text letter), is assigned to the next letter from the credit text. This is the letter L (also from the word All).
Letter C, the third letter of the alphabet (third plain text letter), is assigned to the next unused letter of the credit text. This is the letter C (from the word compositions). The second letter L from the word All is skipped, because is already has been assigned to the plain text letter B.
Letter D, the fourth letter of the alphabet (fourth plain text letter) is assigned to the next unused letter of the credit text. This is the letter O (from the word compositions).
Continue assigning plain text letters to encoded letters using this method. The letter Z doesn't appear in the credit text, so it is assigned to the plain text letter Z.
You will end up with the following (ET: encrypted text; PT: Plain text)

The decoded text reads like this:
La Danseuse
Margaretha Geertruida was a great artist and performed her fabulous exotic show in fourteen countries.
This tells you that the number of countries hidden in the letter matrix in one of the screens of mission 7 is fourteen. Those 14 countries can also be found in a pricing table to the left of the matrix. Using the prices that are assigned to these countries, a message can be decoded from the letter matrix (see solution to mission 7)
4b.
These two circular images show the reassembled image of the puzzle in mission 9.
5.
Back page of the booklet
The seal features the words “might, strength” and “power”. The arabian male surname AZIZ – decrypted codeword for mission three – translates into these terms.
6.
If you fold the outer flaps of the booklet backwards and hold their edges against each other, some of the printed lines will form a drawing of of cube.
The corners of the cube are marked by dots that contain a letter. If you read the letters following the edges of the cube and starting at the top rear corner you will get the word UNFOLDED.
This means that in one of the missions something will have to be folded into a cube (see solution to mission 8).
7.
On November 28 2013, the following document was published on undercover-job.com under News:
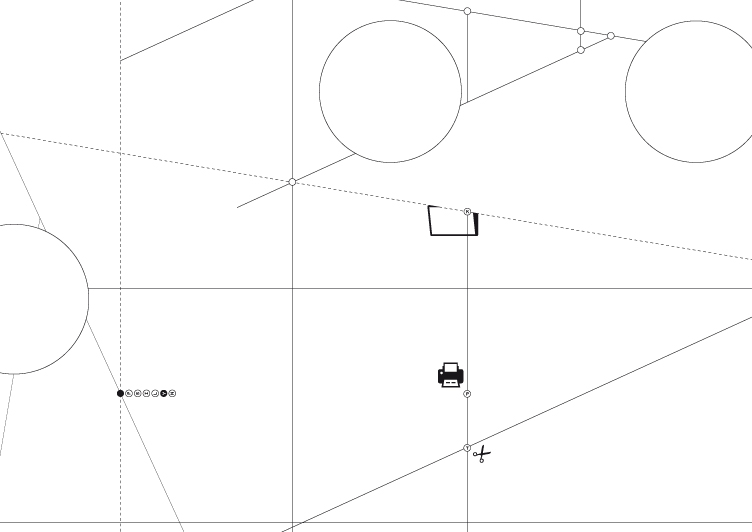
In this document, in the CD booklet and on the CD label you will find six icons and a letter that goes with each one of them.
Scissors – T
Folder – K
Printer – P
Sinking ship – R
Circular arrows – O
Bible – O
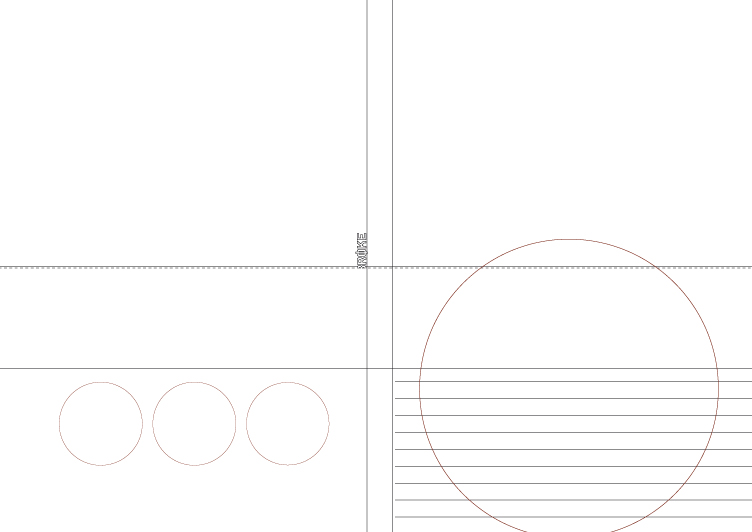
Print out the document in approximately A4 and fold it along the dashed line that runs diagonally. Now you can place it at the booklet along another diagonal line at the same angle, and the cut up icon of the folder will be fully visible.
The letters can now be put in an order in which they (almost) spell out the name of mission 5 (and also track five of the album):
Folder – K
Ship– R
Bible – O
Printer – P
Scissors – T
Circular arrows – O
Next, fold the printed document along the vertical dashed line and search for a matching position in the booklet.You will find that position below the bible icon on the back of the booklet – both the diagonal line and the “strength, might power” circle complement each other. On the printed page you can now see a row of circles with letters that connect to the letter “O” next to the bible icon. Read from top down, these letters are O-P-S-I-L-Y-N. The first and next-to-last letters in the row have different colours than the others – they ask to be swapped, forming the word “Ypsilon”. Ypsilon is the name for the letter “Y” in German. After the letters are swapped, the bible icon has the letter Y assigned to it, and if you put that in the sequence you determined previously, you’ll get the correct spelling of “KRYPTO”.
The resulting order of icons then tells you in what order the individual steps in solving mission 5 have to be taken: Folder – Sinking ship – Bible – Printer – Scissors – Circular arrows
As a reminder – this is what you do to solve mission Krypto:
Folder: enter all letters from A-Z and the numbers from 0-9 in a matrix, similar to the arrangement of files in the folder “INNEN” on the computer screen.
Sinking ship: Play Battleships with the matrix: Read one letter or digit at a time from this matrix by using two coordinates that you get from the sheet music. This will give you the term AGEOFJOB (AGE OF JOB).
Bible: This term has to be read in context with the bible. There, Job has been claimed to live to an age of 140 years after his travails.
Scissors: Locate the number 1, 4, and 0 in the matrix and cut out their boxes.
Circular arrows: The battleship matrix has to be placed on the matrix that can be found on the computer printout. Three letters will be visible through the holes you cut out earlier. After reading these letters, the top matrix has to be rotated by 90 degrees, so that a new set of letters shows.
8.
On the inside of the booklet you will find the following words: Father, Dad, Gave, Christmas.
If rearranged, they form the beginning of a popular phrase used to remember the correct clockwise order of notes in a circle of fifths:
Father Christmas Gave Dad An Electric Blanket
The circle of fifths is important for solving mission 8.
---------- The Cover ------------------------------------------------------------------------------------------------------------------------
9.
On October 9 2013, the following document was published on undercover-job.com under News
This document can be placed at the inside of the opened cover to complete the word „Phlatbrøke“. The letters “Ph” have been swapped with the letter “F”, and the spelling of the letter O as ø (mathematical symbol for Phi) are clues, that the irrational number Phi – also describing the golden ratio – is hidden in Mission 4.
---------- Finally -------------------------------------------------------------------------------------------------------------------------
There is one more complex secret hidden Undercover Job’s CD packaging, opening up the path to hidden bonus content. It involves, among others, some of the circular images of the booklet and the CD label. The solution will be posted separately.
BONUS MATERIAL
Bonus material
Undercover Job’s headquarters has published some bonus materials at a hidden web address. Uncover the following secret will give you the url of this location.
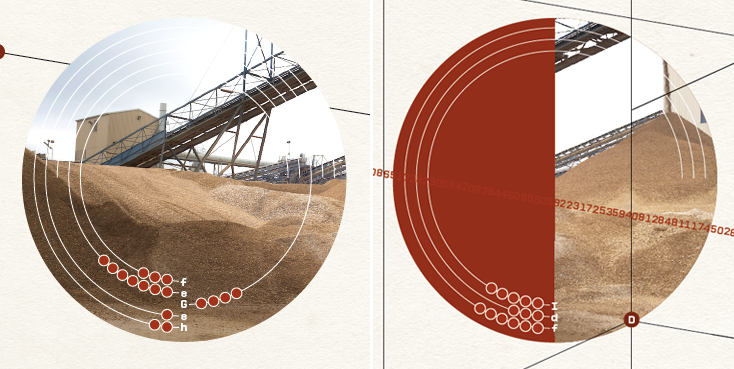
1.
You will need these parts of the CD packaging to decode the web address:
- Underneath the transparent CD tray, several horizontal lines with circles that contain letters are visible.
- There is a copyright warning on the outside edge of the CD label.
- In the booklet there are four circular images. Printed on top of them are letters and uncompleted circular lines, the latter with one or more dots on them.
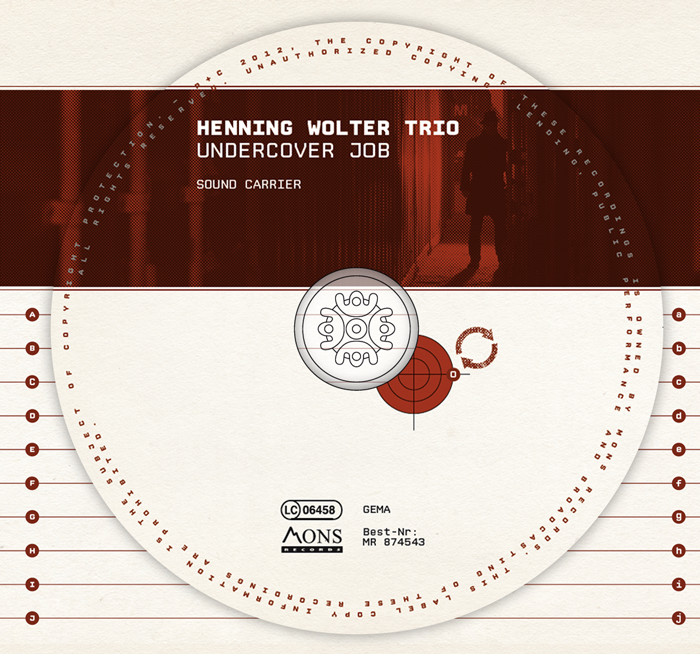
If the CD is put in its tray, you can start to decode the url.
First, turn the CD into a position where the brown-red strip on the top part of the CD aligns with the corresponding strip that is visible through the CD tray. This is position zero.
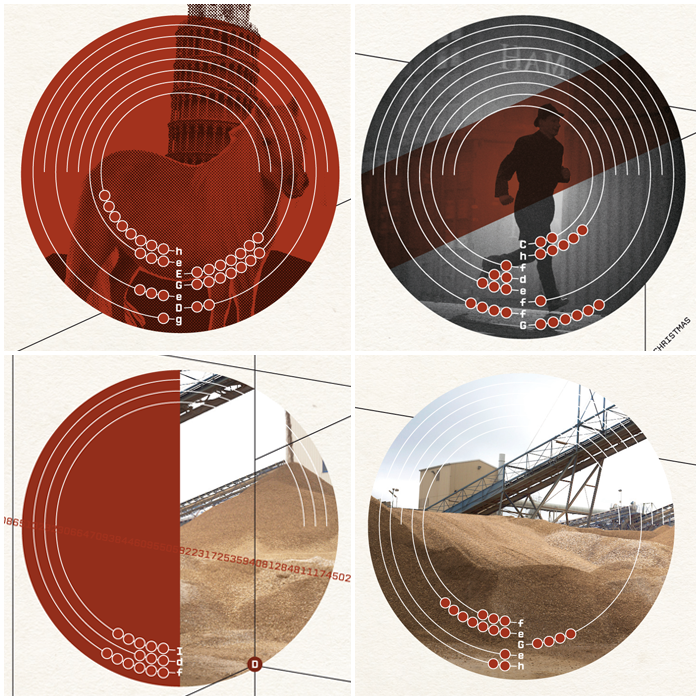
Then, look at the circular image on the inside of the booklet, of which the left half has a solid red-brown colour. You will find three uncompleted circle lines, each of which has several smaller circles (or dots) on it as well as one letter at its base.
To the left of the letter I, five dots are placed on the inner uncompleted circle. This tells you to rotate the CD from position zero to the left (or counterclockwise) by five positions. A position is reached when the thin line underneath the red-brown strip on the CD meets one of the horizontal lines underneath the CD tray. After rotating the CD, look at the small circles with letters on the outer edges of the horizontal lines underneath the tray. Each of them is labelled with either a capital or a lower case letter. Find the letter that is printed next to the rotation instructions you just used – a capital “I” in our example.
Identify this letter on the small labelled circles underneath the tray and follow the horizontal lines they sit on until they meet the rotated CD. At this spot, you will be able to identify one specific letter of the copyright warning. In this example, it is the letter “U”.
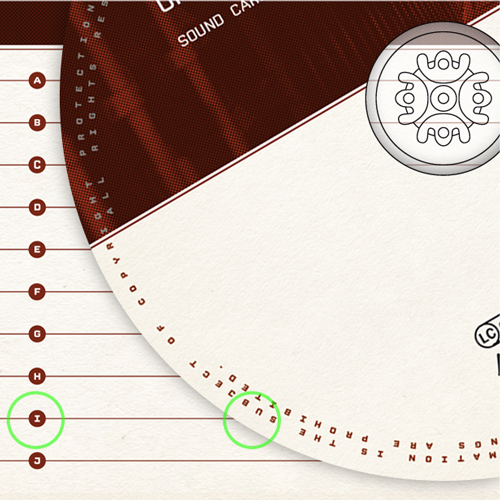
Continue doing so with all the other uncompleted circle lines and letters of the booklet. Clues towards the order in which the plain text associated with each of the circular images have to be put together have been posted under News on January 21, 2014, February 27 2014 and March 22, 2014.
The completed plain text reads: URLSLASHFORYOUREYESONTN
This points to the web address www.undercover-job.com/foryoureyesontn
Among others, you will find here a comic strip explaining the strange spelling at the end of the web address, in which the letters “nt” are swapped with “ly”.
2.
At this address in the right margin, your are asked to “Please log in here”. This will lead you to even further bonus material of Undercover Job, but you need a name and a password to access it.
Also in the right margin there are two links leading to parts one and two of the interactive story “Menace to the Airwaves” (the two QR codes on the back of the booklet link to that story, too, by the way). Once you’ve read both parts of the story, you will know the name and the password that you are being asked for.
The name is: jazzstruction (from „Menace to the Airwaves“ Part 1)
The password is: blackkitty (from „Menace to the Airwaves“ Part 2)
The unsolved puzzle
The unsolved puzzle:
Undercover Job has now been entirely decrypted. Entirely? No – one code hasn’t been broken yet. It consists of three elements:
1. The notes on the front of the CD booklet:
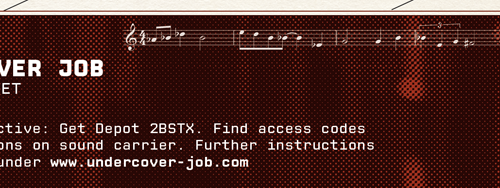
2. The number sequence 111101110111001 on the inner right side of the booklet (above the gold bug cipher)
3. The three circles with the letters “h”, “E” and “uv” at the beginning of that number sequence.
Who will uncover Undercover Job’s last secret? The first one to solve this secret will receive a free CD by Henning Wolter Trio (either “Le grand spectacle” or “Undercover Job”). Send your solution to info@undercover-job.com.